Boston Creme Pie Cupcakes

Boston Creme Cupcakes

For those of you in the DC area, you know we had a “snow day” last week that ended up being a total bust.  There may not have been any real snow, but that did not stop people from completely panicking and shutting down schools and office buildings. I used the extra day at home to my advantage, and made a batch of these Boston Creme Cupcakes.

I wanted to try this recipe not only because it looked awesome and delicious, but it also gave me a chance to make vanilla pastry cream, which I hadn’t done before.  It was not too hard!  The cream requires nearly constant attention and whisking, but only takes about 10 minutes to pull together.  The ganache glaze is also fairly simple, no double boiler required.

In regards to order of assembly, I would make and refrigerate the cream first, then make the cupcakes, and make the ganache while they cool, right before you are ready to assemble. Enjoy!

Boston Crème Pie Cupcakes

From Martha Stewart

  • 1 1/2 cups all-purpose flour, plus more for tins
  • 1 1/2 teaspoons baking powder
  • 1/2 teaspoon salt
  • 1/2 cup whole milk
  • 3 ounces (6 tablespoons) unsalted butter, softened, plus more for tins
  • 3 large eggs
  • 1 cup sugar
  • 1 teaspoon pure vanilla extract
  • Vanilla Pastry Cream (recipe below)
  • Chocolate Ganache Glaze (recipe below)

Preheat oven to 350 degrees. Butter and flour standard muffin tins (or spray them with Bakers Joy, as I did). Whisk together flour, baking powder, and salt in a small bowl. Warm milk and butter in a saucepan over low heat (or microwave it together, as I did).

Beat eggs and sugar with a mixer on high speed until thick and pale, about 5 minutes. Beat in dry ingredients.

With mixer on low speed, add warm milk mixture to batter, and beat until smooth. Add vanilla. Divide batter among muffin cups, filling each halfway. Bake cupcakes until light gold, about 15 minutes. Let cool in tins for 10 minutes, then transfer to wire racks. Let cool.

Using a serrated knife, cut each in half horizontally. Spread 1 tablespoon vanilla cream on each cupcake bottom. Sandwich with top. Spoon glaze over each.  Serve immediately, or let cool in the refrigerator for about 30 minutes.  This allows the ganache to harden and makes for a slightly less messy cupcake!

Vanilla Pastry Cream

  • 2 large egg yolks
  • 1/4 cup sugar
  • 2 tablespoons plus 1/2 teaspoon cornstarch
  • Pinch of salt
  • 1 cup whole milk
  • 1/2 teaspoon pure vanilla extract

Whisk yolks until smooth. Mix sugar, cornstarch, and salt in a medium saucepan over medium heat. Add milk in a slow, steady stream. Cook, stirring, until mixture begins to bubble and thicken, about 5 minutes.

Pour 1/3 of milk mixture into yolks, whisking constantly, to temper the eggs and prevent them from curdling. Pour the egg/milk mixture back into the saucepan, and cook over medium heat, stirring often, until thick, 2 to 4 minutes. Stir in vanilla.

Pass vanilla cream through a fine sieve into a bowl (I used a fine mesh colander). Press plastic wrap directly on surface. Refrigerate until cold, at least 1 hour, or up to 2 days.

Chocolate Ganache Glaze

  • 2/3 cup heavy cream
  • 6 ounces semisweet chocolate, finely chopped
  • 1 tablespoon light corn syrup

Place chopped chocolate in a heat proof bowl. Bring cream to a boil in a small saucepan.  Remove from heat, stir in corn syrup and pour the mixture over the chocolate. Let stand for 5 minutes. Whisk until smooth.  Let cool, stirring often. Use immediately.

SONY DSC

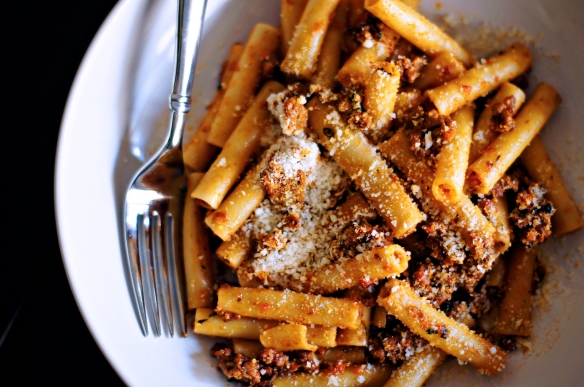
Spicy Calabrese Style Pork Ragu

Pork Ragu

Winter hiatus is over for BistroBess!  The days are getting longer, which means my picture taking window is as well.  It’s not getting any warmer, though, as evidenced by today’s “snow storm”, so there is still time to whip up some comfort food.  Namely, whip up this pasta dish.

Just about every month, one of my food magazines has a recipe for a new take on ragu.  Since my husband loves and is quite picky about Italian food, I only make the ones that seem both delicious and authentic.  This pork based sauce hit both of those notes beautifully.  Slightly spicy, rich and thick, it coated the pasta without being too watery, as many quick cooking sauces can be.  It takes awhile, close to 4 hours on the stove, but really doesn’t requite much from the chef during that time, except for the occasional stir.

Also, if you are looking for some music to listen to while cooking, may I suggest The District Lights new single?

Spicy Calabrese Style Pork Ragu

from Bon Appetit

  • 1 medium onion, quartered
  • 1 carrot, peeled, cut into 1-inch pieces
  • 1 celery stalk, cut into 1-inch pieces
  • 4 garlic cloves
  • 2 teaspoons fresh oregano leaves
  • 1/4 teaspoon crushed red pepper flakes
  • 1/2 cup coarsely chopped flat-leaf parsley, divided
  • 1 28-ounce can whole peeled tomatoes
  • 1/4 cup olive oil
  • 1 pound hot or sweet Italian sausage, casings removed
  • 1 pound ground pork
  • Kosher salt, freshly ground pepper
  • 1 tablespoon tomato paste
  • 1 pound mezzi rigatoni or penne rigate, or any short, tublar pasta
  • 3/4 cup finely grated Parmesan, plus more for sprinkling
Pulse onion, carrot, celery, garlic, oregano, red pepper flakes, and 1/4 cup parsley in a food processor until finely chopped; transfer to a small bowl and set aside. Purée tomatoes with juices in processor; set aside.
Heat oil in a large heavy pot over medium heat; add sausage and cook, breaking up with a spoon, until browned, about 4 minutes. Add ground pork, season with salt and pepper, and cook, breaking up with a spoon, until no longer pink. Using a slotted spoon, transfer to a plate.
Increase heat to medium-high. Add reserved vegetable mixture to drippings in pot, season with salt, and cook, stirring often, until golden, 8-10 minutes.
Stir tomato paste and 1 cup water in a small bowl; add to pot. Cook, scraping up any browned bits from bottom of pot. Bring to a boil, reduce heat, and simmer until liquid has almost evaporated, 6-8 minutes.
Add reserved meat and tomato purée and 1 cup water. Bring to a boil. Reduce heat; simmer, adding more water as needed to keep meat nearly submerged, until meat is tender, about 4 hours. I ended up adding about 2 cups of water over the course of the cooking time in small increments, adding none in the last 20-30 minutes. Taste, season with salt as needed.
Cook pasta until al dente. Drain, reserving 2 cups pasta cooking liquid.
Add pasta and 1/2 cup pasta cooking liquid to sauce; stir to coat. Stir in 1/4 cup Parmesan and remaining 1/4 cup parsley. Increase heat to medium and continue stirring, adding more pasta cooking liquid as needed, until sauce coats pasta. Divide among bowls; top with more Parmesan.
Pork Ragu

Egg & Chorizo Sandwich

So, quick note here… Bess is out of town. This is her husband, James. I take the photos on the site, and I eat everything Bess puts up here. No, I know, I am incredibly lucky. Trust me. This is never more evident than when Bess is out of town. Usually it’s a couple days, and I can fend for myself with any frozen stuff she leaves behind for me… for instance, she made about 20 pounds of her bolognese for me to make pasta when I need to. She also left instructions on how to roast broccoli. Because I need vegetables. Listen, scurvy is nothing to laugh at, and in this case, with Bess being gone for maybe the next 10 – 15 days, you can’t be too safe.

I’m not a complete idiot when it comes to being on my own though. Let’s get that straight. It’s not like I’m your stereotypical dolt of a husband from your average sitcom. I can handle myself if I have to. Of course, that all stops with food. I am abhorrently incompetent in the kitchen, so much so that I’m fairly certain I suffer from a yet to be classified disability that prevents me from being able to prepare a simple meal. Modern medicine will one day discover that millions of people have this acute disorder, and we will be forgiven for all the times we burnt the toast, served pink chicken, carved up an overdone steak, or presented guests with runny eggs. But until then, we have to just hope we meet someone like my wife who can ensure our longevity past 35 through tasty, (mostly) healthy food like hers. I am pretty sure if it weren’t for Bess, I’d be pushing 300 pounds from a steady diet of Papa John’s and, on special occasions, chicken fried rice from the local Chinese delivery spot. I am not exaggerating.

So this morning, I’m pretty proud of myself. I know how to scramble eggs… I mean, who doesn’t? But we had some chorizo (spanish for “Thank you, Jesus”) left in the fridge and I figured I’d experiment with the old “scrambled eggs with melted cheese” recipe I’ve been kicking around since college. That’s right, college. I went there. Unbelievable, I know. Anyway.

This is my best attempt at trying to help the other dolts like me out there who couldn’t hold a spatula right unless someone showed them. Should you find yourself with the following ingredients and about 15 minutes to whip something quick up, this isn’t too hard, and it’s darn tasty.

Scrambled eggs and chorizo sandwich

  • 3 eggs if you’re especially hungry. Or, in my case, breathing.
  • 1.5 oz ground chorizo, or half a link from the package.
  • 1 piece of American cheese.
  • Splash of milk.
  • 2 pieces of bread. Any kind, what do I look like? Your bread guy?
  • Like, a smidgen of oil.
  • Healthy dose of humility in the event that you fail.

Crack eggs in a bowl with a splash of milk. Whisk the eggs and the milk to a froth. Tear up a piece of AMERICAN cheese, none of that foreign stuff. Drop the cheese in the egg mix. OK, now go over to your stove, assuming you have one, otherwise what are you doing here? Dummy.

Heat a pan. I don’t know what they’re called, but it’s like an inch deep. Add the smidgen of oil (that’s a thing right?). Heat to… just heat it up until you can throw a little water in the pan to test to see if the oil sizzles. That’s James Science for seeing if it’s ready for the chorizo. Add the chorizo, mash it up. This stuff cooks quick so don’t be an idiot like me and make a phone call when you put it in, otherwise you’re going to burn it and the fire alarm WILL go off. This is the most annoying part about cooking. You know what? It’s probably a best practice to just remove the smoke detector before you cook. Once browned, scoop the chorizo out and put it on a small plate with a paper towel to soak up the grease. Because. Come on… What are you, an animal? Get rid of the grease, trust me.

Drop the egg froth mix with the cheese in the pan. After a couple minutes, add the chorizo. Stir until it all co… oh crap. Put the toast in. Do that now. You should have done it back when you took the chorizo out, FYI. Don’t worry, I made the same mistake.

OK keep mixing those eggs and the chorizo. Smell that? Something’s burning, turn down the heat to like medium. Keep stirring until the eggs are cooked and then move the pan off the heat. Take a minute to clean up, trust me, you’re going to get a look from your sig-oth when they come home, and it’s going to be because you left the pan on the stove with some egg and chorizo still in there. All because you were distracted by a Youtube video you saw on Reddit and well, there went your Friday.

Alright the toast is done, go and get it out. Now add the egg and chorizo mix to the bottom half of the toast and put the second piece on top. I just told you how to make a sandwich, so if you’ve gotten this far, you know you really needed help with the whole cooking thing.

Here’s what it should look like.

In all seriousness, this is pretty tasty, and I survived the whole process. Speaking of survivors, if you were wondering where Bess is, she’s up in New York and New Jersey helping folks out who were hit hard by Hurricane Sandy last week. Every effort counts, there are still people without power… there are still people without a home. Please donate to whatever charity you prefer with a mission in those areas affected by Sandy, or for more information on how you can help support the recovery effort, visit http://www.serve.gov/sandy.

Garlic Shrimp with Chorizo and White Beans

I will occasionally put a recipe on the menu, but not have high hopes.  This tends be the recipe that falls victim to a night of not feeling like cooking, a night of going out instead and a night of my husband being really sick.  I was pretty sure this recipe was destined not to happen.

Until last night, when I realized I had all the ingredients, and it would take me less than 30 minutes to pull together (not counting deveining the shrimp, gross).  I am so glad I made it!  This was a great weeknight meal, easy to pull together, with really great flavors.  It was filling, but not heavy.

I made some minor changes to the original recipe, notably adding Mexican style chorizo, and, since my store does not carry them, substituting the chiles de arbol with a few dashes of cayenne pepper.

Garlic Shrimp with Chorizo and White Beans

adapted from Bon Appetit

  • 3 TB olive oil, divided
  • 4 oz Mexican style chorizo, removed from casing  *This chorizo has a crumbly texture, unlike the Spanish version, that blends into this sauce nicely.
  • 3 garlic cloves, minced, divided
  • 2 dried chiles de árbol or ¼ tsp cayenne pepper (to taste)
  • 1 bay leaf, preferably fresh
  • 1 1/4 cups chopped tomato (about 8 ounces)
  • Kosher salt, freshly ground pepper
  • 1 TB tomato paste
  • 2 15-ounce cans white beans (such as cannellini), rinsed, drained
  • 1 cup low-sodium chicken broth
  • 1 pound medium shrimp, peeled, deveined
  • 1 teaspoon smoked paprika
  • Chopped flat-leaf parsley
  • Grilled bread (optional, but recommended!)

Preheat broiler.

Heat a large, heavy, ovenproof skillet over medium heat. Add the chorizo, cook and crumble with the back of a wooden spoon for about 3 minutes.  Add an additional 1 TB of olive oil, 1 garlic clove, chiles or cayenne pepper, and bay leaf and cook, stirring constantly, 1–2 minutes. Add tomato. Cook, stirring and smashing tomato with the back of a wooden spoon, until tomato is completely broken down, about 5 minutes.

Add tomato paste and cook, stirring constantly, until paste is deep red and caramelized, 3–4 minutes. Stir in beans and broth. Bring to a brisk simmer and cook until juices are slightly reduced and thickened, 3–4 minutes. Season to taste with salt and pepper.

Combine remaining 2 garlic cloves, 2 TB oil, shrimp, and paprika in a medium bowl; season with salt and pepper and toss to evenly coat shrimp. Scatter shrimp over beans in an even layer.

Broil until shrimp are golden and cooked through, about 5 minutes. Garnish with parsley. Serve with bread for soaking up the sauce.

Kung Pao Chicken Tacos

It must be Taco Week here at BistroBess!  Today I have another spin on classic tacos, this time with an Asian flair. 

Fusing the classic Mexican taco with ingredients from other countries, particularly Korea and other parts of Asia, is a big culinary trend right now.  Many credit this to the popularity of food trucks, which use the portable taco as the perfect vehicle to deliver a variety of flavors.  One of my favorites here in DC is TaKorean, which I recommend you seek out for lunch some day soon.

These Kung Pao tacos are packing some heat, thanks to a healthy dose of fresh chile paste.  Sambal Oelek is available at most grocery stores in the Asian section.  It can be potent, so use with caution!

Kung Pao Chicken Tacos

adapted from Cooking Light

  • 6 skinless, boneless chicken thighs, cut into bite-sized pieces
  • 3 TB lower-sodium soy sauce, divided
  • 1/4 cup plus 1 1/2 tsp cornstarch, divided
  • 1/4 tsp kosher salt
  • 2 1/2 TBs canola oil, divided
  • 1 1/2 TB honey
  • 1 TB dark sesame oil
  • 2 tsp rice vinegar
  • 1 TB sambal oelek (ground fresh chile paste). This makes the tacos quite spicy.  If you prefer less spice, start with 1 tsp and go from there
  • 1 large garlic clove, minced
  • 1/3 cup sliced green onions, about two large
  • 1/2 medium red bell pepper, thinly sliced
  • 1 large carrot, diagonally sliced (or about 10-12 baby carrots)
  • 3 TB coarsely chopped dry-roasted peanuts
  • corn tortillas, warmed in the oven or in a dry skillet

Place chicken in a large zip-top plastic bag. Add 1 tablespoon soy sauce to bag; seal. Marinate at room temperature for 30 minutes.  While chicken marinates, combine 1 1/2 teaspoons cornstarch, remaining 2 tablespoons soy sauce, honey, and next 4 ingredients (through garlic) in a small bowl, stirring with a whisk until smooth. Set aside for later use.

Place 1/4 cup cornstarch in a shallow dish. Remove chicken from bag and add to cornstarch in dish, and toss chicken to thoroughly coat. Shake off excess cornstarch.

Heat a large skillet over medium-high heat. Add 1 tablespoon canola oil to pan; swirl to coat. Add half of coated chicken; sauté for 6 minutes or until done, turning to brown. Remove chicken from pan using a slotted spoon; drain on paper towels. Repeat the procedure with remaining 1 tablespoon canola oil and coated chicken.  Set chicken aside. 

With the heat still on medium high, add remaining canola oil, if needed.  Add onion, pepper and carrot and sauté until crisp tender, about 2 minutes.  Put chicken back in the pan, stir in soy sauce mixture.  Sauce should thicken up and coat the chicken and veggies.

Top heated tortillas with the chicken and veggie mixture.  Sprinkle on chopped peanuts and garnish with extra green onions, if desired.

Fish Tacos

Tacos are the ultimate weeknight meal.  They come together quickly, and require very little actual cooking.  The protein, vegetables and starch are all accounted for, so there is no need for extra side dishes.  And everyone likes them.  I have never met someone who doesn’t like tacos.*

These fish tacos take the standard beef-lettuce-salsa-cheese formula and lighten it up, while also adding flavor and spice.  It may seem a bit fancy, but still come together in about 30 minutes.  Fish filets are ideal for weeknights, since they cook up quickly, and pre-shredded coleslaw is a great time saver.   Perfect for your next Taco Tuesday.  Or Wednesday. Or any day, really.

*I now expect at least a dozen taco hating comments.

Fish Tacos                          

  • 1 TB chile powder
  • 1 TB cumin
  • 1 tsp garlic powder
  • 1 tsp salt, plus a bit more for coleslaw
  • ½ tsp black pepper
  • ½ tsp cayenne pepper (give or take based on your spiciness preference
  • 2 TB olive oil, divided           
  • 2 filets white fish, about 12 oz total weight – I have used both halibut and mahi mahi with success
  • ½  a head of cabbage, thinly sliced, or ½ a bag of pre-shredded coleslaw
  • 2 scallions, thinly sliced
  • Handful of cilantro, chopped
  • 1/3 cup low fat sour cream
  • 1 chipotle pepper, minced
  • Juice of 1 lime
  • Pinch of sugar
  • Corn tortillas, warmed
  • Queso fresco and hot sauce, for serving

Preheat oven to 400.

Mix first 6 ingredients (through cayenne) with 1 TB of olive oil to form a paste.  Rub the spice paste all over the fish, cover with plastic wrap and place in the refrigerator to marinate for a few minutes.

While fish marinates, make the coleslaw.  Place the cabbage, green onions and cilantro in a large bowl.  In a small bowl, mix the sour cream, chipotle, lime juice, sugar and a pinch of salt.  Taste for spiciness and seasoning, add more chipotle or salt if needed.  Combine sour cream mixture with vegetables.  Refrigerate until ready to serve.

Heat the remaining olive oil in an oven proof sauté pan over medium high heat.  Add fish filets; allow to cook about 3 minutes.  Flip and put in oven to finish cooking. Cook time will depend on the thickness of the filets; usually about 5-8 minutes. While fish cooks, heat tortillas in a dry pan or in the microwave. 

Remove fish when done, and using a fork, flake the fish into bite size pieces in the sauté pan to coat in seasoning. 

Assemble the tacos by placing fish, coleslaw, queso fresco and hot sauce on a corn tortilla.


Caramelized Banana Bread

Bananas are the only fruit I genuinely hope we don’t finish during the week.  Throwing away shriveled grapes or moldy clementines makes me sad, but a pile of brown bananas puts a smile on my face.  Time to make banana bread.

The classic recipe from The Joy of Cooking is my go to, and it’s lovely, but this month’s Cooking Light (surprise) featured an entire spread on quick breads.  I am dying to try the sweet potato bread and the maple stout loaf later in the fall.  But this week called for banana bread, and this recipe did not disappoint.  The flavor of the caramelized bananas really adds depth.  The original recipe called for a glaze,which I skipped.  I did add coconut, and it was a nice little addition of both flavor and texture. 

Caramelized Banana Bread

adapted (slightly) from Cooking Light

  • 3 tbsp butter, softened and divided
  • 3/4 cup packed brown sugar
  • 3 medium ripe bananas, sliced
  • 1/2 cup fat-free buttermilk
  • 3 tbsp canola oil
  • 2 tbsp amber or gold rum
  • 2 large eggs
  • 2 cups all-purpose flour
  • 3/4 tsp baking soda
  • 1/2 tsp salt
  • Baking spray with flour  (I used Baking Pam)
  • 1 cup shredded coconut, optional

Preheat oven to 350.

Melt the butter in a large skillet over medium-high heat. Add brown sugar and bananas; sauté 4 minutes, stirring occasionally. Remove from heat; cool 10 minutes.

While the banana mixture cools, combine buttermilk and next 3 ingredients (through eggs) in a small bowl (or in the measuring cup you measured the buttermilk in to save dishes).  Combine flour, baking soda, and salt in another small bowl. 

When the banana mixture has cooled, place in a large mixing bowl, and beat on medium speed until smooth.  Add flour mixture and buttermilk mixture alternately to banana mixture, beginning and ending with flour mixture, just until combined. Fold in coconut, if using. Scrape batter into a 9 x 5-inch metal loaf pan coated with baking spray.

Bake at 350° for 1 hour or until a wooden pick inserted in center comes out with moist crumbs clinging. Cool for 10 minutes in pan on a wire rack. Remove bread from pan, and cool on wire rack.


Spicy Italian Beef

I’m a crockpot-aholic these days. The convenience cannot be beat and the recipes are always big enough for leftovers.  Our freezer is getting stocked, which I’m very happy about.  It’s nice having options (besides cereal or take out) when you don’t feel like cooking.

This is a non-crockpot recipe that I adapted, and it turned out really well. The beef absolutely falls apart, and has a nice spice. We served it over brown rice, but it would be delicious over pasta, or turned into a sandwich.  There is practically no prep work, either.  Just dump everything in the crockpot and go about your day.

Spicy Italian Beef

adapted from The Pioneer Woman

  • 2 ½ – 3 lb chuck roast
  • 2 cups beef stock
  • 1 15oz can crushed tomatoes
  • 1 16oz jar pepperoncini, with juice
  • 1 8oz jar hot cherry peppers, drained
  • 1 4 oz jar pimentos
  • Salt and pepper to taste
  • Handful chopped parley
  • Rice or potatoes or noodles for serving

In a crockpot, combine all the ingredients through pimientos.  Make sure the beef is almost entirely submerged.  You can add a little extra stock if necessary.  Set the crockpot for the amount of time that works for you.  I did 10 hours on low while at work.

When the beef is done cooking, shred in the crockpot using tongs; it should easily fall apart.  Taste for seasoning, add salt and pepper as needed.  Serve over rice, mashed potatoes or noodles.  Sprinkle with chopped parsley. 

*You could also use this to make Italian Beef sandwiches on hoagie rolls, as The Pioneer Woman suggested.  Serve the beef using a slotted spoon, to minimize bread sogginess, and top with mozzarella or provolone cheese.

Classic Hummus

There is a great restaurant in Northern Virginia called Rustico.  Known for an extensive beer collection and yummy pizzas, I go for the carrot hummus. It’s delicious and topped with an amazing feta/herb/ground lamb mixture.  I made a copy cat version of this dish (minus the lamb) for a dinner party appetizer, and it was a pretty respectable homage to the original. 

So, why is this post ittled “Classic Hummus” as opposed to “Totes Amazing Carrot Hummus?”  Because I am a bad blogger, that’s why, and didn’t take any (non instagram) pictures.  But in the process of making the carrot hummus, I purchased a giant container of tahini (it was the only size available), which lead me to make classic hummus last weekend. 

Classic, yes, but boring, no.  Homemade hummus has a great freshness that store bought doesn’t, and it’s quite inexpensive to make.  All the ingredients are things I usually have in my fridge and pantry, minus the tahini, and the food processor makes for quick work.  It is also nice to be able to control the amount of salt and oil in the hummus.  I encourage you to whip some up for your next gathering…you’ll be surprised how simple it is!

Classic Hummus

  • 1 15 oz. can chickpeas, drained and rinsed
  • 2 TB tahini
  • 1 clove garlic
  • Juice of one lemon
  • ¼ cup olive oil, plus 1 TB spicy olive oil (optional)
  • Salt and pepper, to taste
  • Fresh herbs (optional)

In a food processor, combine chickpeas, tahini, garlic, lemon juice and a dash of salt and pepper. With the processor running, slowly add the olive oil and hot oil (if using), blending until smooth.  You might add a little extra olive oil to reach your desired consistency.  Check for seasonings, add salt and pepper if needed.   To serve, drizzle with olive oil and sprinkle with fresh herbs, if desired.

Eggplant, Mozzarella and Saffron Rice Bake

Happy Fall!  What a great time of year.  The days are getting cooler and shorter, but not cold, and it’s still light when I leave work. This is DC’s weather sweet spot, the best time to live in this area. Thankfully tourist season is over, or they would probably never leave!

I am not sure why this dish jumped out at me from the latest Bon Appetit, but I am so glad it did.  It’s a warm, filling one pot meal, but the flavors are really exceptional. Slightly lansagna-esque, but with a twist.  This would be an excellent vegetarian main course, served with a simple side salad.  Even if you don’t like eggplant, I would recommend giving it a try! The directions are long, but it’s pretty easy to pull together.

Eggplant, Mozzarella and Saffron Rice Bake

from Bon Appetit

  • 2 tbsp plus 1 cup olive oil
  • 1 medium onion, minced
  • 1 cup arborio rice
  • Pinch of saffron
  • 1/4 cup dry white wine
  • 1 cup vegetable broth or water
  • Kosher salt
  • 3 large eggplants (about 3 pounds), cut crosswise into 1/8-inch rounds ( I used a mandolin and it was super easy!)
  • Freshly ground black pepper
  • 3 cups store-bought tomato sauce (such as marinara), divided
  • 1 pound fresh mozzarella, cut into 3/4-inch cubes (about 2 cups), divided
  • 1 cup coarsely grated Parmesan (4 ounces), divided
  • Chopped basil, for serving (optional)

Preheat oven to 425.

Using a mandolin, or a very sharp knife, slice eggplant into 1/8 in rounds.  This is slightly thinner than the original recipe. Divide eggplant between two baking sheets, overlapping slightly to fit. Drizzle 1 cup oil over; season with salt and pepper. Bake, turning eggplant and rotating sheets halfway through, until tender and golden brown, about 20 minutes.

While the eggplant roasts, heat 2 tbsp. oil in a large saucepan over medium heat. Add onion; cook, stirring often, until softened, about 8 minutes. Add rice; cook, stirring constantly, for 3 minutes. Stir in saffron, then wine. Cook until wine reduces slightly, about 1 minute. Add broth; season with salt. Cover and cook over medium heat until rice is very al dente and still crunchy, about 6 minutes; remove pan from heat.

Assemble the casserole in a 9×13 baking dish.  Here is the assembly order, from bottom to top:

  • 1 cup marinara
  • 1/3 of the mozzarella, 1/3 of the parmesan
  • ½ the eggplant rounds, overlapping so no sauce or cheese is visible
  • The entire rice mixture, spread evenly
  • 1/3 of the mozzarella, 1/3 of the parmesan
  • 1 cup marinara
  • ½ the eggplant rounds, overlapping so no sauce or cheese is visible
  • 1 cup marinara
  • The remaining 1/3 of the cheeses

Cover dish with foil and place on a baking sheet.  It might bubble over, so this will keep your oven clean!  Bake until sauce is bubbling and cheese is melted, about 15 minutes. Uncover dish and bake until golden on top, about 20 minutes longer. Let stand for at least 10 minutes to set before serving. Sprinkle with chopped basil and serve.